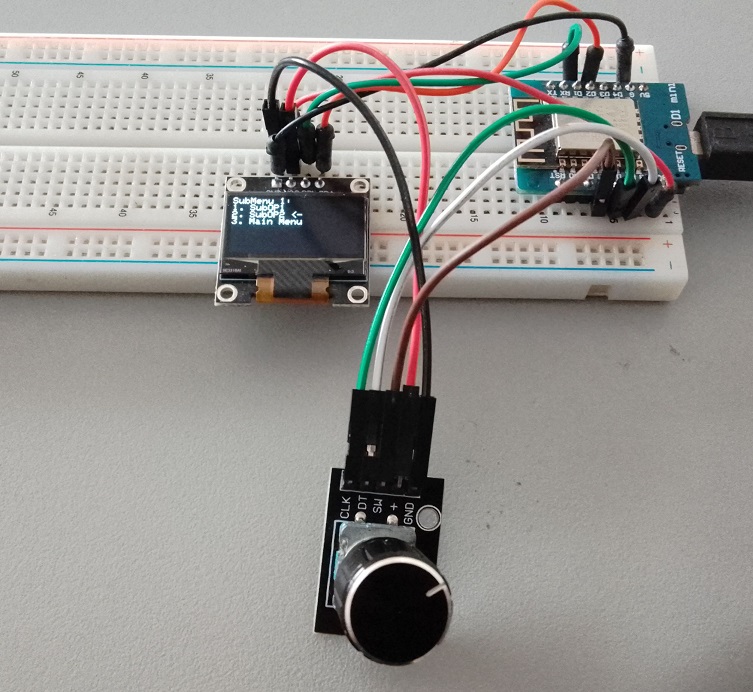
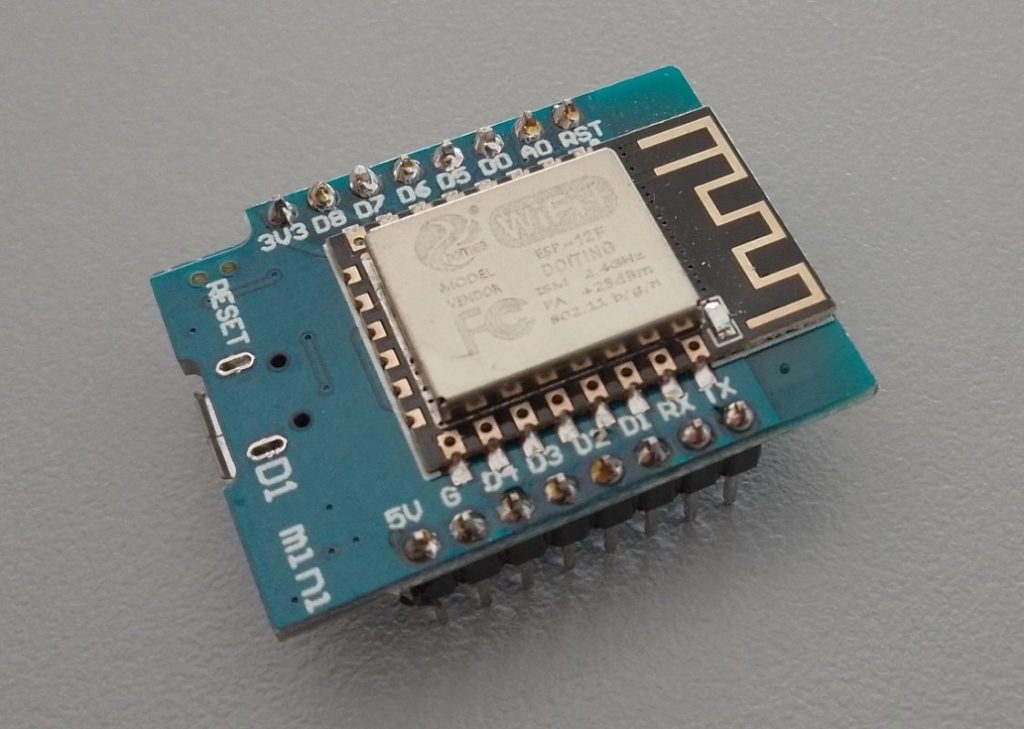
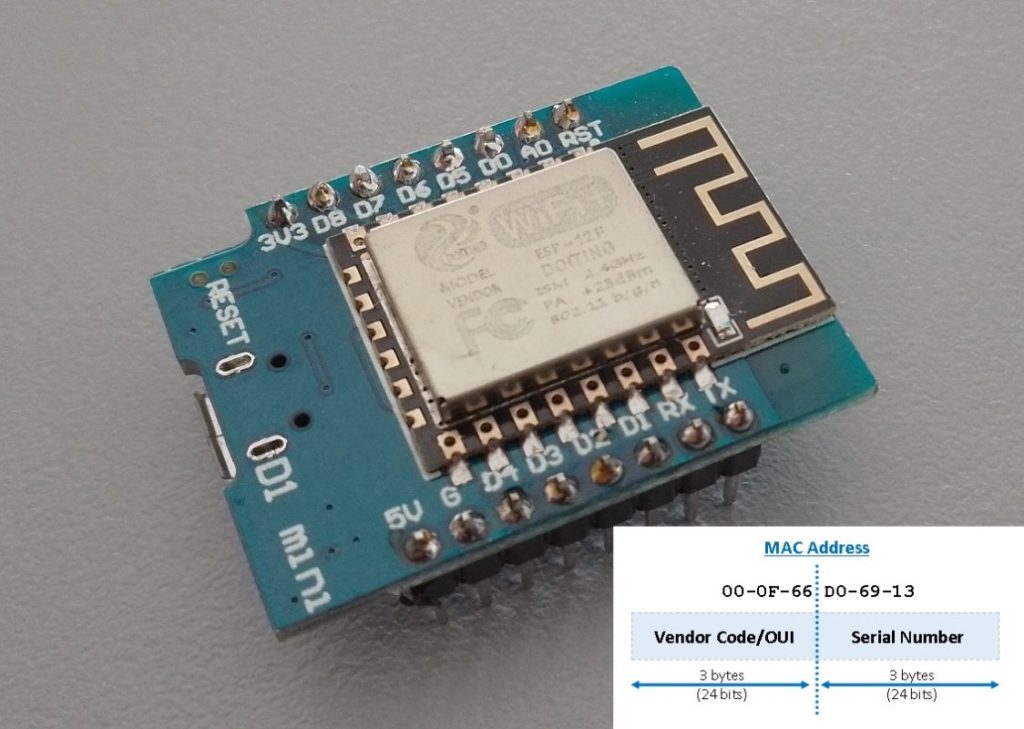
This menu system will allow users to navigate through different options and execute functions accordingly. This is a work in progress but more or less stable.
Hardware Requirements
- ESP8266 Development Board (such as NodeMCU or Wemos D1 Mini) (Affiliate) – Buy on AliExpress
- 0.96″ OLED Display (I2C interface) (Affiliate) – Buy on AliExpress
- KY-040 rotary encoder with Cap (Affiliate) – Buy on AliExpress
- Breadboard and jumper wires (Affiliate) – Buy on AliExpress
Software Requirements
- Arduino IDE
- Libraries: Wire, Adafruit_GFX, Adafruit_SSD1306
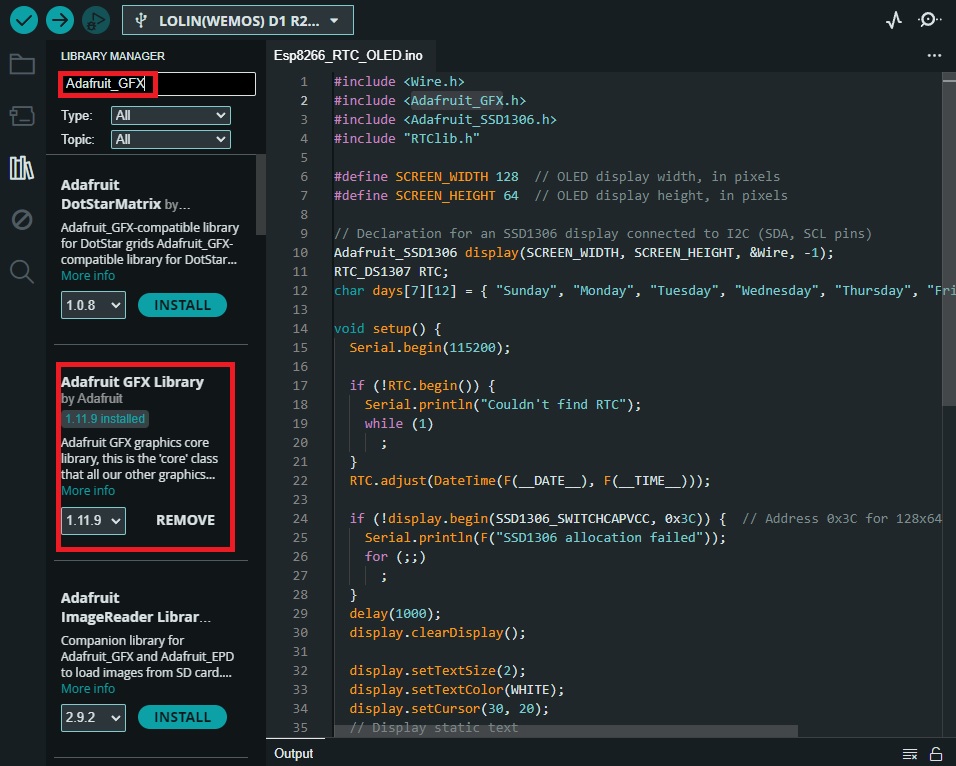
Open the Arduino IDE and navigate to
Sketch -> Include Library -> Manage Libraries
. Search for and install the following libraries:
-
Adafruit_GFX
-
Adafruit_SSD1306

Setting up the Hardware
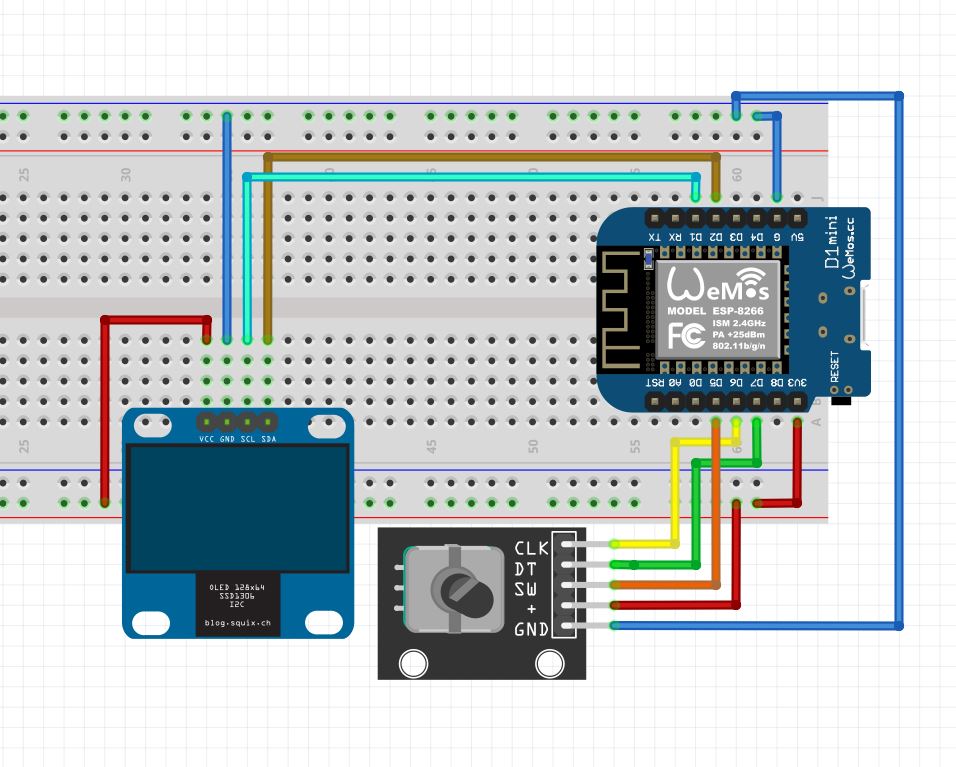
Connect the Encoder as follows:
- CLK pin of KY-040 to D6
- DT pin of KY-040 to D7
- SW pin of KY-040 to D5
Connect OLED Display to Breadboard:
-
- Connect the VCC pin of the OLED display to the 3.3V pin on the Wemos D1 Mini.
- Connect GND on the OLED display to the GND pin on the Wemos D1 Mini.
- Connect SDA on the OLED display to the D2 pin on the Wemos D1 Mini.
- Connect SCL on the OLED display to the D1 pin on the Wemos D1 Mini.
Complete the circuit with the diagram bellow

Diagram
Refer to the diagram below to assist you with the wiring connections. Ensure that all ground wires are connected correctly for optimal performance.
Writing the Code
#include <Wire.h>
#include <Adafruit_GFX.h>
#include <Adafruit_SSD1306.h>
#define CLK D6 // CLK pin of KY-040 connected to D5 (GPIO14)
#define DT D7  // DT pin of KY-040 connected to D6 (GPIO12)
#define SW D5  // SW pin of KY-040 connected to D7 (GPIO13)
#define SCREEN_WIDTH 128  // OLED display width, in pixels
#define SCREEN_HEIGHT 64  // OLED display height, in pixels
Adafruit_SSD1306 display(SCREEN_WIDTH, SCREEN_HEIGHT, &Wire, -1);
int lastCLKState = LOW;
int lastDTState = LOW;
int mainMenuEncoderPos = 0;
int subMenu1EncoderPos = 0;
int subMenu2EncoderPos = 0;
int currentMenu = 0; // 0 for main menu, 1 for submenu 1, 2 for submenu 2
unsigned long lastDebounceTime = 0;
unsigned long debounceDelay = 200; // Adjust ENCODER debounce delay as needed
void setup() {
pinMode(CLK, INPUT_PULLUP);
pinMode(DT, INPUT_PULLUP);
pinMode(SW, INPUT_PULLUP);
Serial.begin(115200);
if (!display.begin(SSD1306_SWITCHCAPVCC, 0x3C)) {
Serial.println(F("SSD1306 allocation failed"));
for (;;);
}
delay(1000);
display.clearDisplay();
display.setTextSize(1);
display.setTextColor(WHITE);
display.setCursor(0, 0);
display.println("Menu:");
display.println("1. OP1");
display.println("2. OP2");
display.display();
}
void loop() {
int CLKState = digitalRead(CLK);
int DTState = digitalRead(DT);
if (CLKState != lastCLKState) {
if (millis() - lastDebounceTime > debounceDelay) {
if (DTState != CLKState) {
switch (currentMenu) {
case 0:
mainMenuEncoderPos++;
break;
case 1:
subMenu1EncoderPos++;
break;
case 2:
subMenu2EncoderPos++;
break;
}
} else {
switch (currentMenu) {
case 0:
mainMenuEncoderPos--;
break;
case 1:
subMenu1EncoderPos--;
break;
case 2:
subMenu2EncoderPos--;
break;
}
}
displayMenu();
lastDebounceTime = millis();
}
}
lastCLKState = CLKState;
lastDTState = DTState;
// Check for button press to select menu option
if (digitalRead(SW) == LOW) {
if (currentMenu == 0) {
executeSelectedOption();
} else {
executeSelectedSubOption();
}
delay(500); // Debounce delay for button press
}
}
void displayMenu() {
display.clearDisplay();
display.setCursor(0, 0);
switch (currentMenu) {
case 0:
if (mainMenuEncoderPos % 2 == 0) {
display.println("Menu:");
display.println("1. OP1 <-");
display.println("2. OP2");
} else {
display.println("Menu:");
display.println("1. OP1");
display.println("2. OP2 <-");
}
break;
case 1:
if (subMenu1EncoderPos % 3 == 0) {
display.println("SubMenu 1:");
display.println("1. SubOP1 <-");
display.println("2. SubOP2");
display.println("3. Main Menu");
} else if (subMenu1EncoderPos % 3 == 1) {
display.println("SubMenu 1:");
display.println("1. SubOP1");
display.println("2. SubOP2 <-");
display.println("3. Main Menu");
} else {
display.println("SubMenu 1:");
display.println("1. SubOP1");
display.println("2. SubOP2");
display.println("3. Main Menu <-");
}
break;
case 2:
if (subMenu2EncoderPos % 3 == 0) {
display.println("SubMenu 2:");
display.println("1. SubOP3 <-");
display.println("2. SubOP4");
display.println("3. Main Menu");
} else if (subMenu2EncoderPos % 3 == 1) {
display.println("SubMenu 2:");
display.println("1. SubOP3");
display.println("2. SubOP4 <-");
display.println("3. Main Menu");
} else {
display.println("SubMenu 2:");
display.println("1. SubOP3");
display.println("2. SubOP4");
display.println("3. Main Menu <-");
}
break;
}
display.display();
}
void executeSelectedOption() {
if (mainMenuEncoderPos % 2 == 0) {
// Enter submenu 1
currentMenu = 1;
displayMenu();
} else {
// Enter submenu 2
currentMenu = 2;
displayMenu();
}
}
void executeSelectedSubOption() {
switch (currentMenu) {
case 1:
if (subMenu1EncoderPos % 3 == 0) {
subOption1Function();
} else if (subMenu1EncoderPos % 3 == 1) {
subOption2Function();
} else {
currentMenu = 0; // Go back to main menu
displayMenu();
}
break;
case 2:
if (subMenu2EncoderPos % 3 == 0) {
subOption3Function();
} else if (subMenu2EncoderPos % 3 == 1) {
subOption4Function();
} else {
currentMenu = 0; // Go back to main menu
displayMenu();
}
break;
}
}
// Function for option 1
void option1Function() {
// Add your code here for handling option 1
display.clearDisplay();
display.setCursor(0, 0);
display.println("Option 1 Selected");
display.display();
delay(2000); // Delay to display the message
displayMenu(); // Display menu again after executing option
}
// Function for option 2
void option2Function() {
// Add your code here for handling option 2
display.clearDisplay();
display.setCursor(0, 0);
display.println("Option 2 Selected");
display.display();
delay(2000); // Delay to display the message
displayMenu(); // Display menu again after executing option
}
// Function for SubOption 1
void subOption1Function() {
// Add your code here for handling SubOption 1
display.clearDisplay();
display.setCursor(0, 0);
display.println("SubOption 1 Selected");
display.display();
delay(2000); // Delay to display the message
displayMenu(); // Display menu again after executing option
}
// Function for SubOption 2
void subOption2Function() {
// Add your code here for handling SubOption 2
display.clearDisplay();
display.setCursor(0, 0);
display.println("SubOption 2 Selected");
display.display();
delay(2000); // Delay to display the message
displayMenu(); // Display menu again after executing option
}
// Function for SubOption 3
void subOption3Function() {
// Add your code here for handling SubOption 3
display.clearDisplay();
display.setCursor(0, 0);
display.println("SubOption 3 Selected");
display.display();
delay(2000); // Delay to display the message
displayMenu(); // Display menu again after executing option
}
// Function for SubOption 4
void subOption4Function() {
// Add your code here for handling SubOption 4
display.clearDisplay();
display.setCursor(0, 0);
display.println("SubOption 4 Selected");
display.display();
delay(2000); // Delay to display the message
displayMenu(); // Display menu again after executing option
}
Understanding the Code
- The code initializes the OLED display and sets up the rotary encoder and push button.
- It defines menu navigation logic and functions for executing menu options.
- Options and sub-options are displayed on the OLED screen, and users can navigate through them using the rotary encoder.
- When a menu option is selected, the corresponding function is executed.
Customizing the Code
- Modify the menu options and functions according to your project requirements.
- You can add more menu levels or options by extending the code logic.
- Customize the OLED display layout and appearance to suit your preferences.
Uploading the Code
- Connect your Wemos D1 Mini to your computer via USB.
- Open the Arduino IDE and select the appropriate board and port.
- Copy the provided code into a new sketch and verify it for any errors.
- Upload the code to your Wemos D1 Mini.
Testing the Menu System
- After uploading the code, power up your Wemos D1 Mini.
- You should see the main menu displayed on the OLED screen.
- Rotate the encoder to navigate through the options and press the button to select.
- Verify that the selected options execute the corresponding functions properly.
Conclusion
In this tutorial, we’ve demonstrated how to create a menu system using a Wemos D1 Mini and OLED display. With this menu system, you can easily add a user interface to your IoT projects, allowing for intuitive interaction and control. Feel free to customize the code and hardware to fit your specific project needs.
